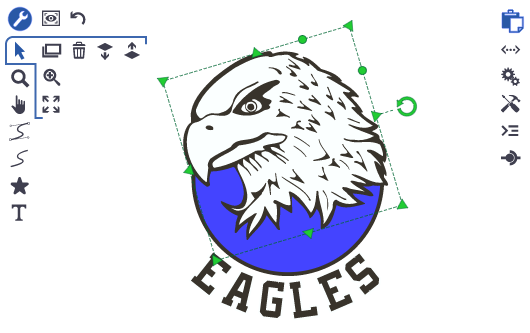
Canvas allows users to interact with the CadX technology in the browser. The objectives of the API are:
Canvas HTML Component
Implements an HTML component where documents can be rendered and manipulated by the user.
Canvas 3D HTML Component
Provides a 3D model viewer for real time edition of designs.
Canvas Scripting
Provide an imperative view of CDL that support both simple and complext manipulation of documents.
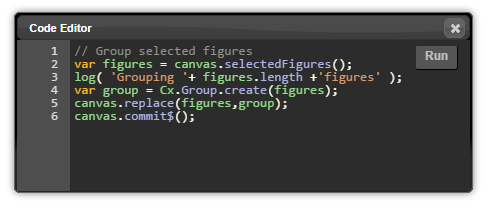
var figures = canvas.selectedFigures();
canvas.group(figures);
canvas.commit$();
Canvas API Core services
Expose CadX Core services in packed an easy to use functions that returns concrete JavaScript objects (Document, Figure, Brush). Users should be able to load a document, change it and save it back in the server with ease:
Canvas depends on CoreJS and it uses the Cx.js loading scheme. Given that CoreJS path is [Core] and Canvas path is [Canvas], the minimun setup looks like:
CoreJS needs a running CadXWorX server. The Edge version of the server is deployed at http://cadxfarm1.cloudapp.net/master-edge. You can tell Core the path of the server using:
Check the Configuration reference for a complete list of options. While developping your app is advisable you always include &cadx.v=&cadx.debug=true in your app URL. This will expose the Canvas debug tools, read the Debugging page for more information.
Canvas API exposes an imperative view of CDL (CadWorX Declarative Language), format used through all our software stack. It is designed to serve both simple (replacing a figure in a template) and complex manipulation of CDL document and templates.
The API follows JavaScipt semantics and naming conventions as much as possible, and fills the gaps borrowing the style of other popular frameworks like JQuery and Lo-dash, libraries that are used internally and encourage to interact with the API.
CDL tag names are CamelCase. For the most part, they are translated to Canvas using the same CamelCase tag name for type names and backCase for properties.
// <ContourOffsetX="10"></Contour>
var c = Cx.Contour({ offsetX: 10 });
Creation of elements
CDL elements are translated to typed objects in Canvas:
You can mix JSON and Canvas objects if you already have the objects available:
var contour = Cx.Contour({ offset: 10
, brush: figure.brush() });
Properties
Following JQuery properties semantics, CIL properties exposes both get and set functionality directly using the property name to define a public function (with or with out parameters).
// Getter
var ox = shadow.offsetX();
// Setter
shadow.offsetX( ox+10 );
Setters return the modified object and can be chained to update several properties in a single line:
// Setters chaining
shadow.offsetX(10)
.offsetY(10)
.gap(3);
The values returned from properties are typed. You will get a number, a string or a brush when you query the for them. Property setters expect the same courtesy from the user, and passing a string when a number is required is undefined behavior.
Array properties
Working with lists of items is very common when dealing with CDL documents. A document is a list of figures, a figure has a list of processes, a linear gradient brush has a list of colors, Canvas has a list of selected figures. These lists are also exposed as normal properties:
// Getter
var figures = layer.figures();
// Setter
layer.figures( [text, shape, raster] );
The setter in this case will directly replace all figures in the document by the new given figure list.
Array properties can also be accessed using indexing:
// Get one figure
var figure = layer.figures(2);
// Replace one figure
layer.figures( 2, raster );
Array properties getters returns an extended version of a JavaScript Array. These arrays tries to mimic as much as possible the standard Array interface. All the functions in the standard are available. They work in the same way as normal arrays:
var figures = layer.figures();
for(var k=0, size=figures.length; k<size; ++k){
var figure = figures[k];
figure.translate(offset);
}
The new JavaScript standard iteration functions (and the extensions provided by lo-dash) are great tools for list handling, reading Underscore.js documentation is heavily recommended before using Canvas. The algorithm above can be writen as:
_.invoke( layer.figures(), 'translate', offset );
Cx Arrays extends the standard set of mutation functions to help in our domain. For example, following the example above, the user can remove the small figures using:
figures.remove(smallFigures);
The new mutation functions are:
Function
Definition
.clear()
Remove all elements
.add(a)
Add elements
.set(a)
Clear and add elements
.remove(e)
Remove given elements
.erase(i,n)
Remove a range (same as splice(i,n?n:1))
.insert(i,a)
Insert element at a given position
.replace(e,a)
Replace elements
.replaceAt(i,v)
Replace element at given index
.moveForward(v,n)
Relocates elements forward
.moveBackward(v,n)
Relocates elements backward
For all functions, the parameters specs are:
a value or array of values to be added
e value or array of values to be removed
v value or array of values to be relocated
i array index
n count
Functions that remove values return these values so the user can use them or dispose them if needed.
The canvas background is used to show decorations or app specific guides.
var backgrondDocument = canvas.background();
// ... modify and commit$ like a normal document
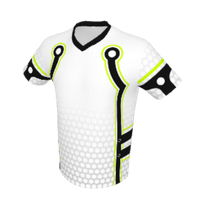
The background document is independent from the document the Canvas is displaying. You can have a document (the design you will transfer to a shirt) and display it with different kind of backgrounds: a realistic t-shirt for a final preview, a simplified version that is just a bounding box to aid in edition mode, etc.
If you want a background that will be persisted with the document, then use a background layer in your documents. The Canvas background is only for the apps to be able to add things like a page box for reference.
For applications that needs to preview a product and offer basic modifications in 3D, a light weight version of the 3D machinery can be used. The model view
Cx3D.createPreview(domId,docId);
This function will give you back a Cx3D.Preview object that derives from Cx3D.ModelView and holds a Cx3D.ProductionTexture internally to make things easier on the dev side. This kind of application doesn’t use a Cx.Canvas at all, improving the performance in case many previews are used on the same page.
If the app wants to show a modified version of the template, to avoid flickering, the document needs to be modified before any rendering. This is done using a document filter function:
Cx3D.createPreview( domId, docId, function(doc){
// modify what you want, no need to commit anything
// if you need any metrics, return the promises so we can wait for them
});
For example, modifying the first Text in the document is done with:
var preview = Cx3D.createPreview('preview','8c4642b0-4669-4da9-a22c-b1e058f7ec2f',function(doc){
var figure = Cx.findByType( doc.allPagesFigures(), Cx.Text );
if( figure )
figure.text('New text');
});
Modifying the document with user input
If the apps wants to show the original template, and later allow the user to change the text.
preview.ready$() .then(function(doc){
// Ok, document is loaded, you can enable your text box or buttons
})
Change actions over the document are written as usual:
// this shouldn't be called if the preview is not ready...
onTextChanged: function(value){
var doc = preview.document();
var figure = Cx.findByType( doc.allPagesFigures(), Cx.Text );
Texture islands with the same name across all pages should share the same brush to keep the system consistent. Use the following function when changing the brush of a texture island:
doc.textureIslandBrush(figure,brush);
One possible flow for a multi size 3D application is to ask the user to design one size to create a template that will be copied over all other sizes. The following function implements a scaled or non scaled copy, it is expected that the arrangements in both documents are similar.
doc.copyDesignTo$(doc,{scaled:false}) .then( ...
Model 3D
Given a Document 3D, the associated model can be accesed with:
doc.loadModel3D$() .then(function(model){ ...
In case of having the server id of the Model, or the Xml representation:
Cx3D.Model.load$(id) .then(function(model){ ...
var model = Cx3D.Model.fromXml(xml);
var model = Cx3D.Model.fromXmlString(s);
Properties
Type
Def
Definition
modelData3D
String
null
Server Id of associated Model Data 3D
An empty working space document associated with this model can be created with:
Commit started, hook to assure things like showThrough color
'commit'
Transaction finished succesfully
'revert'
Transaction failed, state reverted to previous history point
'undo'
Fired after an undo operation
'redo'
Fired after a redo operation
'pageschanged'
Pages array changed
'activepagechanged'
Active Page changed
'layerschanged'
Layers array changed
'activelayerchanged'
Active layer changed
Creation
var doc = Cx.Document();
Pages
doc.pages(i,a);
doc.activePage();
doc.activePageIndex();
doc.releasePages(pages);
Layers
doc.layers(i,a);
doc.activeLayer();
doc.activeLayerIndex();
doc.releaseLayers(layers);
Figures
doc.figures(i,a);
doc.allFigures();
The document offers helper functions to directly modify the figures in the active layer. The doc.group(figures) function will remove the figures from the document, and add them grouped.
doc.backOne(figures);
doc.toBack(figures);
doc.forwardOne(figures);
doc.toFront(figures);
doc.autoCreateMultiPartText$(figures);
doc.breakMultiPartText(text);
doc.group(figures);
doc.ungroup(figures);
doc.extractPowerClipContents(figure);
doc.addPowerClipContents(figure,content);
doc.reshape$(figures,action);
Transactions
doc.lock();
doc.unlock();
doc.commit$();
doc.revert$();
doc.update$();
Utilities
doc.background();
doc.clone();
doc.toXmlString();
Loading and Saving
Cx.Document.load$(id) .then(function(doc){ ...
Cx.Pages.load$(id) .then(function(pages){ ...
Cx.Layers.load$(id) .then(function(layers){ ...
Cx.Document.fromXmlString(string);
Cx.Document.fromXml(node);
doc.saveCopy$();
doc.save$();
doc.isSaved();
History
Each document keeps track of its history up to undoLimit states. History is used both as a way to let users undo and redo their work, and to allow transactions to be properly reverted.
if( doc.canUndo() )
doc.undo();
if( doc.canRedo() )
doc.redo();
When implementing undo and redo actions for your app, use the canvas.undo() machinery that uses tools history instead of plain document history. Read more about Canvas and tools history in the Canvas reference.
Templating
Adds a clipart centered in the template and with proper scaling (half the template size)
doc.addClipart$(clipart) .then(...
Replaces a clipart taking care of keeping the user transform, placing and size.
There are five figure types: Cx.Text, Cx.Shape, Cx.Raster, Cx.Group and Cx.ProxyGroup. They all share the same base: Cx.Figure. These are the common properties and functions.
Properties
Properties
Type
Def
Definition
name
String
null
Figure name
xType
String
'CadX.Figure'
Figure type
pen
Pen
empty
Figure outline
brush
Brush
empty
Figure fill
alpha
0…1
1
Global alpha
locked
Boolean
false
If true, the figure can not be selected
hidden
Boolean
false
If true, the figure is not visible
visible
Boolean
true
Opposite of hidden
anchor
Anchor
Relative (0.5,0.5)
Figure anchor generator
preMatrix22
Matrix22
Identity
Transformation applied before processes
processes
Process Array
[]
Figure effects
matrix22
Matrix22
Identity
Figure transformation
pin
Point
(0, 0)
Figure position
powerClipContents
PowerClipContent Array
[]
Power clipped figures
metadata
Metadata
empty
App metadata
Read only properties
Properties
Type
Def
Definition
localId
Integer
unique
Client based unique id, not serialized
canBeSelected
Boolean
true
Is visible and is not locked
outputFigure
Figure
null
Processed figure output
grouped
Boolean
false
The figure is inside a group
isEmpty
Boolean
false
Text with no lines, shape with not polyregions, group with no figures
Canvas offers manipulation functions to modify the document and ask the user to use .commit$() when the transaction is finished:
var doc = canvas.document();
var parts = canvas.selectedFigures();
var group = Cx.Group.create(parts);
doc.replace(parts,group);
doc.commit$();
Canvas will automatically lock itself, give feedback to the user and render the results after the transaction is committed.
To further help in the building process of new clients, Canvas API provides cooked in actions that covers the most common needs of a template application.
Instead of the code above, you can just wrote canvas.action('group') to get a function that will group the selected figures when called. You could use it like:
Actions are function objects and expose useful query functions:
var action = canvas.action('group');
var id = action.id(); // => 'group'
var info = action.info(); // later...
var tooltip = action.tooltip(); // later...
if( ! action.enabled() ) {
// Disable your UI button
}
When you create an action, you can modify its target. Instead of applying the action to the selected figures, you can choose to target the context figures (defined as the selected figures when the selection in not empty and all the figures in the layer otherwise).
var action = canvas.action('group', { target: 'contextFigures' } );
You can also give a callback that will be issue once the action is complete and everything has been rendered in the Canvas:
var action = canvas.action('group', {
callback: function(group){
// Do something specific to your client with
// the newly created group...
},
scope: this
});
The current list of build in actions is (these are the functions exposed in the selection toolbar in the HUD, the list will quickly grow to cover transforms and other usual actions):
Working with async operations is more complex than normal sync code mainly because:
You need to be able to wait for the results to be generated, for example if you need to communicate with a distant server in order to produce them.
You also need to be able to react to failure conditions that are outside of your control, the server may be down or unable to process your request.
The usual way to tackle this is using callbacks. You pass a function that will be called with the generated result when the work is done. If anything went wrong, you need to inform the error through a flag in the callback. An usual async function will look like:
var async1 = function(pa,pb,callback){
setTimeout(function(){
// do async work with pa and pb, generate result and then...
if( error && callback ) {
callback( null, 'something went wrong' );
return;
}
// return result
if( callback ) callback( result );
},1000);
};
var async2 = function(callback){ ... };
And you will use it as:
async1(pa,pb,function(result,error){
if( result ) {
// Do something after we are done
}
else {
// Handle error condition
}
});
async2(function(result,error){ ... });
This is fine and it works. But when you try to compose code using this pattern things gets out of hand quickly. The simplest way to see the hidden complexity is try to wrap one of this functions to be able to process the result before it gets to the hands of the caller:
var asyncWrapper = function(pa,pb,callback){
async1(pa,pb,function(result,error){
if( callback ){
if( result ){
// process and generate new result
callback( myResult );
}
else {
callback( null, error );
}
}
});
};
We need to forward the error condition from the wrapped async function so the caller of asyncWrapper can also react.
The promises pattern
The promises pattern is a formalization of async operations handling that allows the creation of composable code, simplifying these kind of scenarios. The idea is simple, instead of passing a callback in the parameters you return a Promise object from your async operation that represents the future value to be generated.
var promisedValue = asyncOperation$(pa,pb);
The promise will be resolved later on time when the value is ready, or it will be rejected if something went wrong at some point. To be able to get the value you attach a callback using the done function that will be issued when the operation is done:
promisedValue.done( function(value){
// the operation is done, value is ready to be used
});
There is no need to ask if there is actually a value inside the done callback because it will only be called if the operation is successful. To handle error conditions you add a fail callback like:
promisedValue.fail( function(error){
// handle failure condition
});
We do not need to create a named variable for the promised value, and both done and fail function will return back the promise so you can chain the calls directly like:
asyncOperation$(pa,pb).done( function(value){
// the operation is done, value is ready to be used
}).fail( function(error){
// handle failure condition
});
Til here, we didn’t gain much, the code looks similar to the one using callback in the parameters. An initial small win is that now callback are not longer mixed with other function parameters. But the formalization of the promise object is the key to attach extra functionality that will allow us to easily compose operations that uses this pattern.
Chaining (then)
The first important extension is the then function. When we created the asyncWrapper, we had the need to be able to process the generated value in an async operation before the user can use it. In the promises world, you can do it by attaching a filter that will be executed when the value is ready, let you create something new using it and pass that value along the chain of async operations. The function we coded before can be rewritten as:
The then function takes a doneFilter, and wrap the promised value returning a new promise where you can later attach new callbacks. If we have used named variables for each promise, it would look like:
var asyncWrapper = function(pa,pb){
var promise1 = asyncOperation$(pa,pb) ;
var promise2 = promise1.then( function(value){
// process and generate new result
return myValue;
});
return promise2;
};
You can also return a promise yourself inside the filter allowing the piping or chaining of async operations. The newly created promise will also be rejected automatically if something went wrong in any of the operations before. We do not need to place any special error treatment in the asyncWrapper, the caller will be able to attach a fail callback without problems. If you ever need to filter the error condition to attach extra information, the then filter.
To showcase what then buys us, lets analyze an algorithm where we need to execute one async operation chained after the other and give the user the chance to know when both operations are done. Using the callback parameter we will do it like:
var chainedAsync = function(callback){
async1(pa,pb,function(result1,error1){
if( result1 ) {
// Do something after async1 and then call
async2(function(result2,error2){
if( result2 ) {
// do something when async2 is done
if( callback )
callback(myResult);
}
elseif( callback )
callback(null,error2);
});
} elseif( callback )
callback(null,error1);
});
}
The same operation, using promises and then looks like:
var chainedAsync$ = function(){
return async1$(pa,pb).then( function(result1){
// Do something after async1 and then call
return async2$().then( function(result2){
// do something when async2 is done
return myResult;
});
});
}
You can see how much clean the code looks now that we do not need to deal with error propagation because it is being done for us. We can also just use result1 and result2 because we know that the doneFilter will only be issue when things when right. And because chainedAsync$ is returning a promise, the user can continue to chain whatever needs to be done after the second async operation is done.
Understanding done and then
It is important to understand the difference between done and then. The done function adds a callback that will be issue when the value is ready to be consumed and returns the same promise so you can continue to work with it.
operation1$()
.done( function(value1){ // (a)
// Do something when operation1$ is done
})
.done( function(value1){ // (b)
// This will also be called when operation1$ is resolved.
});
operation1$() => p1
|__ done -> (a)
|__ done -> (b)
On the other hand, then introduces a filter that will let you process the generated value and return a new promise:
operation1$()
.then( function(value1){ // (a)
return operation2$(value1);
})
.done( function(value2){ // (b)
// This will be called when operation2$ is done.
});
operation1$ => p1
|__ then -> (a) operation2$ => p2
|__ done -> (b)
Concurrent operations (when)
Another usual task when working with async operations is to issue several concurrent operations and do something when all of them are done. You can be loading different resources to generate your result for example. To be able to wait for jobs concurrently, we needed to do something along the lines of:
var concurrentAsync = function(callback){
// We are going to wait for async1 and async2
var count = 2;
var results = [];
var gatherResults = function(i,result,error){
results[i] = result;
errors [i] = error;
if( count-- == 0 ){
// Both are done...
// do something here and return
callback( myResult, myError );
}
};
async1(pa,pb,function(result1,error1){
gatherResults(0,result1,error1);
});
async2(function(result2,error2){
gatherResults(1,result2,error2);
});
}
We have an abstraction in jQuery that simplifies these kind of tasks: the $.when function takes an arbitrary number of promises and produces a new promise that will be resolved when all operations are done. If any of the concurrent promises gets rejected, the created promise will be rejected and your fail callback will be issued.
One of the strength of promises is that once you start using promises, making composed async operations is a lot easier (once you understand how this works, obviously).
Creating promises (Deferred)
Til here, we have always used operations that were already returning a promise. To create a promise object jQuery exposes the Deferred object. You do it like:
var operation$ = function(pa,pb){
var dp = Cx.Defer();
// perform async work and then...
setTimeout(function(){
dp.resolve( value );
// if anything went wrong
dp.reject( error );
},1000);
return dp.promise();
}
You first create a deferred object using the Cx.Defer() constructor. When the operation is done and you have generated the value to be returned you call the resolve function. If something went wrong you trigger the fail using the reject function.
The last line uses the promise function to return a stripped down version of the Deferred object that do not expose the mutator functions resolve and reject.
Abstracting in the async world
We want to create a LightBox (a showcase box for a figure) using something along the lines of:
// Add Light Box
figure.bounds$() .then(function(bounds){
var lbb = Cx.Shape.CreateRectangle({
bounds:bounds.inflate(50,50), brush:...});
var lightBox = Cx.Group.create([lbb,figure]);
doc.add( lightBox );
canvas.zoomToFit$() .then(function(){
doc.commit$();
});
});
A first step to make this code more readable and, more importantly, to allow reuse of code is to modularize parts of the work in the same way you will do it in a sync world. Imagine we could avoid the need for async operations, the code above will look like:
var bounds = figure.bounds();
var lbb = Cx.Shape.CreateRectangle({
bounds:bounds.inflate(50,50), brush:...});
var lightBox = Cx.Group.create([lbb,figure]);
doc.add( lightBox );
canvas.zoomToFit();
doc.commit();
In this case, there is an abstraction screaming to be made:`
Now we can just code the above functionality like:
var lightBox = App.createLightBox(figure,50);
doc.add( lightBox );
canvas.zoomToFit();
doc.commit();
The same thing can be done in the async world to keep the complexity as low as possible and to let others use the functionality we are creating. Promises are a great tool to allow you to easily refactor out reusable parts of your functions. We can create an async operation to create the light box like:
That using this indentation looks exactly the same as the sync version, even with the two async operations being performed:
var lightBox = App.createLightBox(figure,50);
doc.add( lightBox );
canvas.zoomToFit();
doc.commit();
We are using the done function because we are not interested in chaining or creating a callable function. This may be the operation executed when you press a button so nobody will be waiting for the result. You could have used then without problems, and normally you will want to use then for each middleware function you are creating so your users can compose your functions with all other promise based operations.
Cx objects are generally owned by other objects in the document model. For example, the figures in a layer are owned by it and the brush in a contour belongs to that process. These objects implements a owned object protocol to avoid aliasing problems while modifying the document.
When a new object is created, it doesn’t belongs to any other object. So the following snippet will create a free brush:
When a free object is used to set another object property, the free object is adopted by the parent object without making any copy:
contour.brush( brush );
// brush is no longer free, contour owns it
Cx.assert( brush.owner() == contour );
If an owned object is used to set a property, the object will be cloned to avoid duplicated references:
contour.brush( figure.brush() );
// contour's brush and figure's brush are different objects, owned by different parents.
Cx.assert( contour.brush() != figure.brush() );
The protocol was selected for being a good compromise between simplicity and efficiency (a possible option could be to use copy-on-write for efficiency or copy-on-set for simplicity). Free or owned objects shouldn’t be something you are thinking on while using the API. It just works, and you can relax about when to clone and object… you never need to do it, the model knows better than us how to avoid getting into troubles. The only caveat is that the following snippet could be confusing:
var brush = figure.brush();
// ...
contour.brush( brush );
brush.color( color ); // Wrong!
// contour's brush and brush are different objects, owned by different parents.
Cx.assert( contour.brush() != brush );
The way to avoid these patterns is:
contour.brush( figure.brush() );
var brush = contour.brush();
brush.color( color ); // Good...
But if you can not use the above pattern, you can add the clone explicitly:
Canvas is a scripting language to manipulate documents (templates). It is not only intended to use as a internal model to be able to render things in the browser; you can use it to load documents from the server, modify them and send them back with out showing in the browser nothing more than a progress bar. You can do batch updating of things in the DB like this without the need of asking the server Core team to do it for you. All the power of the engine is there for you to use it in your local machine.
Things can fail
Because of the nature of the interaction between CxEngine in the server and Canvas in the client, some operations are async and there are more places where failures can appear: the internet may be down, the server may be overloaded, etc. Even when you do simple scripting it is useful to be able to work using transactions. Being able to mark valid points in your work allows for a more fine grained treatment of failures. You do not need to redo everything, it is enough to go back til the last valid committed state and do the last part that has failed. In this context, transactions are an important piece of CIL design and are not related to the need of a History feature for the user. You can use CIL without doing any transaction, nobody will force you to do it, transactions are a natural part of the design. A good analogy is to think that you are working with something similar to a revision control system (an old one where you need to explicitly lock resources. So, if you need to modify a figure you will do it like:
figure.lock();
... load resources, modify the figure ...
figure.commit$();
The first lock let others know that this figure is being working on by throwing a document event. Our system allows you to work with figures in parallel, but you can not modify the same figure in parallel. If you modify the whole document, you will write:
doc.lock();
... modify the doc ...
doc.commit$();
Modifying CIL objects is like changing files in your local repository in the revision system. Your local files (model) are changed until you reach an atomic change set. When you reach that point, you call the .commit$() function to complete the transaction.
If something goes wrong in the middle, you can easily revert your local changes back to the last committed state like:
doc.lock();
... modify the doc ...
... something went wrong ...
doc.revert$();
An important thing to understand here is that the lock/commit$ mechanism is just a transaction scheme and does not generate by itself any history, there is no redo/undo in the picture yet. The mechanism just saves the last committed state to be able to go back to it when you do a revert, so you can program against a failure prone system (like it is the internet, server infrastructure, etc) with better tools. So til here, there is no history, no rendering, no tools disabling, no user feedback. The above description is about our template scripting language.
Canvas
Lets put the Canvas component in the table. This is the main piece used to build browser applications that needs to render templates or interact with user. Now, on top of being able to modify a document, we need to do more things to give a good user experience. The minimal set of things to take care of are:
(a) Render the document at moment where it makes sense (avoid showing the guts of batch operations to the user… no jumps around, no flickering because you first loaded something of a given color and later you changed it, etc).
(b) Disable all other tools when an operation is being performed so there are no race conditions. Again CIL only allows you to modify one figure at a time.
(c) Give visual feedback to show that an operation is being performed, and that the user shouldn’t keep hitting the screen to make it “do something”.
(d) Maintain a history of all the operations performed so the user can undo/redo.
(e) Select newly added figures.
A possible design is to let the developer deal with these issues. He will need to write code like:
0. canvas.disable(); // b
1. canvas.startFeedback(); // c
2. doc.lock();
3. ... modify the doc ...
4. canvas.selectedFigures(newFigures); // e
5. doc.commit$();
6. history.push(doc); // d
7. canvas.stopFeedback(); // c
8. canvas.enable(); // b
9. canvas.render$(); // a
This is unacceptable, imagine if for just moving a figure we will need almost 10 lines of code.
Canvas tackles this problem by defining that is going to show every committed state of the document. This makes sense because the state at the end of every transaction effectively represent the successful completion of an atomic change set. Canvas listens to the document ‘commit’ event and calls render after it avoiding the need of line 9.
The tools will also be disabled when an operation starts (that is, when someone locks the document to start working on a new change set). Once the change is complete after the ‘commit’, we can safely enable the tools back. Line 0 and 8 can be eliminated.
The same is done for user feedback. As soon as somebody starts an operation we show the user feedback (on ‘lock’) and when the operation is complete we just stop the work in progress feedback (on ‘commit’). Line 1 and 7 are automated.
History is defined as every committed state of the document. Because rendering happens at that point, this means that the user will get a history point for every operation he see completed on the canvas. Canvas automatically creates a history point when the ‘commit’ event is issued removing the need for line 6.
Newly added figures can also be automatically selected when the transaction is done. This creates a standard behavior for user created actions that helps making the UI more coherent. We can then remove line 4.
So, the code to make a proper action ends up being:
doc.lock(); // => Trigger 1, 2
... modify the doc ...
doc.commit$(); // => Trigger 4, 6, 7, 8, 9
The user can just code its action in the same way that he will do to create batch scripts. There is nothing new to learn. Canvas will automatically work.
It makes even more sense when possible failures are analyzed. Every time you call revert$(), Canvas will also be re-enabled and the work in progress feedback will be stopped. No rendering and history needs to be generated here.
An important implication is that clients have a clear pattern to follow to create pre or post-operation events. The client may have other tools to disable/enable that are not part of Canvas. They can listen to the ‘lock’ and ‘commit’ events in the same way that Canvas tools do. Other kind of feedback may be wanted (a progress bar, a loading symbol, a timer). Also, property watchers like a display for the document bounds, or a label showing the current price for the design can no be easily automated to be updated after each commit.
Further details on the lock/commit$ pattern
Conceptually .lock() and .commit() are not really a pair, although they will usually use together. Locking has to do with a limitation of our system, we can no modify the same figure at the same time by two different actions. When you start an action, you have to lock your target (doc or figures). But if your action starts with a modification, you can omit the .lock() call because each modifier will auto-lock like:
figure.pin( ... ); // => auto-lock
figure.commit$(); // => auto-unlock
If you need to load resources before modifying the document in your action you need to be explicit and lock the document:
doc.lock();
... load resources, modify doc ...
doc.commit$();
Our system works like Git in the sense that a commit only modifies the local copy and not the saved document in the server. If you think about the pattern of loading a document, performing some modification and the save it back, then our system will map to Git as follow:
Figure measurements and the processing needed to obtain its output representation are asynchronous and possibly expensive operations. When you change a property of the figure, for performance reasons, Canvas will try hard to avoid performing the whole computation again by updating its internal measurements and output representation locally whenever possible. Expensive updating operations will not be triggered every time the model changes. The figure remembers its invalidation state waiting for the next update$. Model changes work in batch:
figure.pin( canvas.center() );
figure.matrix22( Mx.scale(2,2) );
figure.brush( Cx.Brush({ rgb: 'FF0000' }) );
// Now the figure is in an invalid state, measurements and the output representation
// that is rendered in Canvas are outdated
figure.update$() .then(function(){
// Now the figure measurements and its output representation are up to date,
// but the Canvas has not been touched
});
The model will automatically invalidate itself when using the public API so all these optimizations will work behind the scene and apps shouldn’t need to worry about them. But direct manipulation of primitive types needs a manual call to invalidate:
figure.pin().x = 20;
figure.matrix22().s00 = 2.0;
// figure is in an undefined invalidation state now
figure.invalidate();
// good, everything will work now
Avoid at all cost this pattern, apps should not need any .invalidate call at all if they treat primitive types as whole values always. You have to think that a point is actually equivalent to a number or a string in JavaScript. We can not expect that the model will work if you change a character in an array like this:
figure.name()[3] = 'a'; // this should strike you as the same as figure.pin().x = 20
So every time you change a point, a matrix or other primitives types in the model, just use them as immutable objects passing around:
var center = canvas.center();
figure.pin( center );
The list of primitives types in Canvas API is: number, integer, angle, magnitude, string, point, matrix, frame and bounds. They are easy to recognize because their members are plain JavaScript variables (.x and .y, .p0, .s00, etc).
Owned mechanics
Cx objects are generally owned by other objects in the document model. For example, the figures in a layer are owned by it and the brush in a contour belongs to that process. These objects implements a owned object protocol to avoid aliasing problems while modifying the document.
When a new object is created, it doesn’t belongs to any other object. So the following snippet will create a free brush:
When a free object is used to set another object property, the free object is adopted by the parent object without making any copy:
contour.brush( brush );
// brush is no longer free, contour owns it
Cx.assert( brush.owner() == contour );
If an owned object is used to set a property, the object will be cloned to avoid duplicated references:
contour.brush( figure.brush() );
// contour's brush and figure's brush are different objects, owned by different parents.
Cx.assert( contour.brush() != figure.brush() );
The protocol was selected for being a good compromise between simplicity and efficiency (a possible option could be to use copy-on-write for efficiency or copy-on-set for simplicity). Free or owned objects shouldn’t be something you are thinking on while using the API. It just works, and you can relax about when to clone and object… you never need to do it, the model knows better than us how to avoid getting into troubles. The only caveat is that the following snippet could be confusing:
var brush = figure.brush();
// ...
contour.brush( brush );
brush.color( color ); // Wrong!
// contour's brush and brush are different objects, owned by different parents.
Cx.assert( contour.brush() != brush );
The way to avoid these patterns is:
contour.brush( figure.brush() );
var brush = contour.brush();
brush.color( color ); // Good...
But if you can not use the above pattern, you can add the clone explicitly:
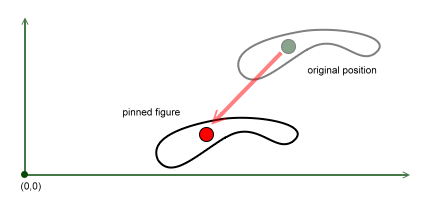
In CDL documents figures are placed by centering the Anchor reference point to the defined Pin position.
Figure Pin
Whenever a figure is added to a document, its Pin is defined as the (0,0) coordinate. You can also set it at the figure definition:
var figure = Cx.Text({ line: "Phrase"
, ...
, pin: Px(100,50) });
Or change it later using the pin property as usual:
figure.pin( Px(100,20) ); // Or directly figure.pin(100,20);
Also we may change the position of a figure with respect to its current position:
figure.translate( offset ); // Or figure.translate( x,y );
This would change the figure’s position in x horizontally and y vertically.
Other operations can also modify the figure’s position, for example rotation around a given pivot point:
figure.rotateAround(pivot,degrees);
Figure Anchor
To be able to place a given figure in the Pin position we need to define a reference point relative to the figure curves. This point is called Anchor in our system and it is an important piece in building well behaved templates that the user can modify.
The following diagram illustrates the relationship between the Anchor and the Pin. We start with a given shape that is defined by a single Region with a closed boundary. The original points in this curve are the ones in the upper-right corner of the document. The green point is the Anchor of the Shape, in this particular case is an Absolute Anchor. This is the point that will be used to center the figure in the Pin position, sketched in the diagram with a red dot.
shape.anchor( Cx.AbsoluteAnchor(pos) );
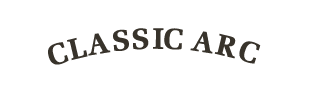
We use a Relative Anchor to define a good reference point for Texts for example. The reference point will be obtained relative to the bounds of the processed figure (before the final transformation is applied).
text.anchor( Cx.RelativeAnchor(rx,ry) );
The following diagram showcased what happens when the user modify the line of a given Text. The Anchor is defined as Cx.RelativeAnchor(0.5,0.5) in this case. So the center of the bounds is placed at the pin position marked here again as a red dot. The figure accommodates nicely around the Pin.
The Anchor of the figure is an object that defines an absolute and a pos properties.
var anchor = figure.anchor();
if( anchor.absolute() ) {
var asolutePos = anchor.pos();
// ...
}
else {
var relativePos = anchor.pos();
// ...
}
Direct positioning
Sometimes, it is useful to avoid the Anchor-Pin model and directly work with the figure bounds. We can use center or align operations to define the pin with respect to other points or objects in the document.
figure.center$(pos); // Or figure.center$(x,y);
The center$ function takes any objects that defines a center (Canvas, bounds, frame or even a list of figures). For example, we can place the figure in the middle of the view with:
figure.center$(canvas); // Center the figure in the middle of Canvas
Modifying the model is always a sync operation. Normally there is no need to care about the async nature of the interaction between Canvas and the server. For example:
figure.translate(10,0);
figure.rotateAround(figure.pin(),45);
figure.commit$();
On the other hand, if metrics are needed to define the values that you are going to change then we are in promises land. Getting metrics is an async operation in Canvas. As every async operation in Canvas, metrics functions are marked with a trailing $ and will return a promise for the computed value:
figure.center$() .then(function(center){
figure.rotateAround(center,45);
figure.commit$();
});
Figure metrics
Name
Type
Definition
matrix$
Matrix
Transformation applied to curve points
bounds$
Bounds
Bounds of the rendered figure
center$
Point
Center of the figure bounds
frame$
Frame
Frame of the rendered figure
vectorBounds$
Bounds
Curves Bounds, pens dropped
vectorFrame$
Frame
Curves Frame, pens dropped
Pre metrics
The figure frame is computed transforming with the matrix the bounds of the untransformed figure. We call the metrics of the untransformed figure pre metrics. These metrics are needed for some operations like envelope equalization.
Name
Type
Definition
prePin$
Point
Untransformed pin, figure anchor
preBounds$
Bounds
Bounds of the untransformed rendered figure
preCenter$
Point
Center of the figure pre bounds
preVectorBounds$
Bounds
Untransformed Curves Bounds, pens dropped
Global metrics
Grouped figures are then transformed by their parents matrix. Global metrics provide an easy way to know the final bounds of a figure even if they are grouped. If the figure is not grouped, global metrics will be equal to the normal metrics. The global version of the metrics are: globalMatrix$, globalBounds$, globalCenter$, globalFrame$, globalVectorBounds$, globalVectorFrame$, globalPreBounds$ and globalPreVectorBounds$.
Examples
[TODO]
Why metrics are async operations?
Canvas JavaScript engine (Cx) is unable to reproduce every operation supported by the CadWorX CadXEngine server. Only a subset of CDL documents can be completely handled locally. For example, a Text will need the server to process the fonts, generate the vector representation of the characters and arrange them to get to its final output vector shape representation. We call updating to the act of computing the figure’s output representation (composed of only simple shapes and raster figures). Because Cx may need the help of CadXEngine server, updating a figure is an asynchronous operation. Measuring geometry figure properties like bounds and frame requires the output of the figure to be up-to-date.
When using metrics, Canvas takes care of updating the figure behind the scene. Figure updating can also be triggered manually using:
figure.update$() .then(function(figure){
// ...
});
If you already know the figure is up-to-date, you can use synchronous versions of the metrics. The set of functions that needs the figure to be updated are marked with a trailing underscore sign, underscore so developers can easily identify them: bounds, frame, center_:
figure.update$() .then(function(figure){
var b = figure.bounds_();
var f = figure.frame_();
// ...
});
These may be useful in some contexts, but always go for the async version of the metrics first. Calling any metric_ function when the figure is invalidated (its output has not been updated) will result in an exception. As reference, internally metrix$ is implemented like:
Transformations using the center of the figures bounds as the pivot. We need to use metrics here so these operations are asynchronous.
figure.rotate$(angle);
figure.scale$(sx, sy);
figure.mirrorX$();
figure.mirrorY$();
Cx.rotate$(figures, angle);
Cx.scale$(figures, sx, sy);
Cx.mirrorX$(figures);
Cx.mirrorY$(figures);
Alignment
figure.center$( to );
Cx.center$( figures, to );
Center a figure or a figures list. to can be a point or anything that has a center (bounds, frame, other figures).
figure.align$( alignment, to [, margin] );
Align the figure against a given bounds.
alignment any combination of Left, Center, Right with Top, Middle, Bottom. Examples: “TopLeft”, “Center”, “Bottom”, “CenterMiddle”. It doesn’t matter the order or if you put a space or a comma between them (this is ok: “Top Right”).
to a bounds object of something we can get bounds from (canvas,frame,other figures).
margin optional margin for the alignment
Cx.align$( figures, alignment [, to, margin] );
Align a group of figures to a given bounds. If you call it without a to parameter it will align the figures against themselves.
Cx.groupedAlign$( figures, alignment, to [,margin] );
Align the figures without loosing their relative distances.
Examples:
// Center figures in Canvas
Cx.center$( figures, canvas );
// Align figures to the top of the Canvas (respecting relative distances)
Performs a reshape action on a list of figures. The action can be any of Cx.E.ReshapeAction: ‘Combine’, ‘Weld’, ‘Condense’, ‘FrontMinusBack’, ‘BackMinusFront’, ‘BreakApart’, ‘BreakApartRegions’ and ‘BreakApartByColor’
var zones = Cx.uniqueColorZones(figures, { collapseTags:[bool] });
Returns a list of unique color zones composed of a solid color (both from pens and brushes) and with textures. Each zone has a value member that can be a Cx.Color or a Cx.TextureBrush.
Cx.changeColorZone(figures, zone, newValue);
Replaces a color zone with a new value.
var map = function(color){ return newColor -or- color; };
Cx.convertColors(figures, map);
Converts the colors in the figures using the function map.
Canvas API offers extensions and global parameters to configure the user experience in a per client basis. To set up your configuration options is to include a Cx.Canvas.Config.js file after Canvas scripts has been loaded (this may improve later when Canvas starts offering head.js based loading tools).
In this file, you will define the configuration of Canvas just as you would do with a Web.Config file in ASP.Net.
User defined typed metadata for figures
It is very useful to be able to attach metadata to each figure in a document when implementing the client logic. Things like “Fabric”, “Material” or “HighQualityPrinting” may only have meaning in the particular context of a certain application. The approach that Canvas takes, it to give clients the basic properties that are common when building graphic application and offer an extension point for user defined properties.
In you Cx.Canvas.Config.js file you can call the function:
Once this is inplace your client can use their own defined properties in the same way it uses the normal figures properties (like “pin, “layer”, etc).
// In the client code
// getter
var ft = figure.fabricType() ;
// setter
figure.fabricType('Linen');
For each property, the type config option let the system do automatic parsing into the real representation of your properties. You can select ‘string’, ‘number’, ‘integer’, ‘boolean’, ‘point’, ‘color’, ‘brush’, etc. For a complete list read this non existent documentation (?). This is very useful to avoid writing code like parseInt( figure.charLimit() ) in your code base that can lead to subtle bugs.
The def config set up a default value for figures where the property has not been yet defined and dropDef controls if the value is going to be dropped from the CDL in the case it is the default. This is useful for metadata that has a clear default that will not change in the future. For example, the Text columnCount property is dropped if its value is 1.
You can check a real configuration file used by Kiosk4 here: Cx.Canvas.Config.js
Properties defined by one client and stored in Cx servers are not going to be dropped, even if other clients will open these documents. All the metadata will be kept safe as an internal key-value dictionary in the figures.
Because other clients may later use the same names, it is convenient to use some kind of namespace when naming your client defined properties. For TX project we are using properties with names like “txName”.
Global parameters
Canvas exposed several global parameters that control optimizations, general user interface related strategies and debugging modes. To change a particular variable use:
This is a (probably) incomplete list of configuration variables. Look directly in the source code to check an up-to-date version of it.
Name
Def
What it does
enableDocumentHistory
true
Document history is an expensive feature that simple applications should be able to disable. If you only care for quick rendering like in a Kiosk application and the UI is not going to offer undo/redo functionality, set this variable to false.
useCurvesBasedSelection
true
If the shapes are big enough, the user will be able to select a figure behind other figures frame. Disable this option to get pure frame based selection.
useCharactersBBoxBasedSelection
true
If the figure is a Text, avoid using the internal curves and perform the hit testing using the character bounding boxes. This allows us to take into account the pen width and offer the user big enough hit surfaces for the letters.
renderLocallyWhenPossible
true
For simple cases, when there are not TextureBrush, PowerClips or other unsuppoted CDL properties, the figure will be drawn locally using SVG and Raphael instead of calling the server RenderCachedFigure (Core: Figure/Render).
avoidCacheWhenRenderLocally
true
If we can draw locally, then there is no need to cache the figure.
renderPenBehindFillLocally
true
SVG does not support pens behind fill directly, so we have to produce the same effect by doing one path with the pen and another copy of the path with fill over it. Disable this option if the browser is having problems copying with the extra curves.
renderAnisotropicTransformLocally
true
SVG applies transforms to the pen nib. In chrome and firefox this can be disabled using the vector-effect property setted to non-scaling-stroke and compensate for the scaling factor manually. This flag enables local rendering for both browsers and leaves IE with server rendering.
processLocallyWhenPossible
true
For simple shapes we can avoid the call to Figure/Render directly because there is no processing needed to be done. This option improves a lot the experience when dealing with cliparts. The only caveat is that this figures will not have a cache Id so some idioms that the Designer2 was using needs to be updated to always call the new async function CadX.Figures.cache first.
showLocalPreviewRepresentation
true
When a server image representation is requested for the first time to the server a preview grayed local SVG based representation will be showed to the user as visual feedback.
showServerRenderingLoadingAnimation
true
When a server image representation is requested for the first time to the server and it is not possible to do a local preview (because the figure is a Raster or showLocalPreviewRepresentation is false) a loading animation is showed in the place the figure will appear.
previewUsingRealRepresentation
true
Brushes and pens are applied to the preview to match as best as possible the real representation while waiting for the server.
replaceColorsLocallyWhenPossible
true
When the figure can be drawn locally we can avoid re-processing it in the server for color replacing operations and directly replace the colors in the output figure maintained locally. This will invalidate the relationship between the current cached figure in the server and the local representation so the cache Id of the figure is dropped in the process.
useSubpixelPinForServerRendering
true
When asking an image to the server we only use a subpixel version of the pin. When the figure is translated an integer number of pixels (given the current zoom) we can use fastTranslate because we know that the image returned by the server will be exactly the same (because the subpixel pin is equal). This happens when users move things dragging it on the screen. Disabling this option will avoid the use of fastTranslate and always ask the server to render using the real pin. This is not something you will like to disable often, since the experience you will get is a lot worse.
computeFigureGeometryLocally
true
The bounding box and final transformation of the figures will be updated using the local object model instead of calling the server MeasureRenderInfo.
alwaysRenderLocally
false
This option will force the system to render everything locally even when the result is not perfect because of unsupported CDL properties. It is a good idea to use it when testing some things because of the speed improvements. This option overrides the renderLocallyWhenPossible option.
Whenever you add a figure to the active layer of a document, that figure will get automatically selected for you in the Canvas when you commit$ your transaction.
If at any point of the transaction you change the selection by hand, then auto selection will not kick in for newly selected figures. The following transaction will leave Canvas without any selected figures.
doc.add([ figure, border ]);
doc.selectedFigures( figure );
doc.commit$(); // Manual selection, border is not selected
With this simple scheme, figure auto selection will do what is expected for almost every transaction you will ever write. There are some corner cases where you will not want want automatic selection to kick in for a given transaction. If you find yourself in that case just call:
canvas.keepSelection();
doc.add(figure);
doc.commit$(); // Auto selection disabled for this transaction
You can call this function at any point before the transaction commit$.
If you want to disable the feature altogether for all your transactions you can use:
canvas.autoSelection(false);
These is not recommended, because the app will need to select the newly added figures by hand in each transaction.
Figure annotations lets Apps highlight a figure including some text to give the user feedback. Annotations are Canvas dependent, you may spawn multiple Canvas over the same document showing different annotations in each of them.
The basic API is the following:
// Annotate figures with a given message and a highlight them with a box
These versions are useful, but normally applications will have some rules that defines when a figure should be annotated. The app could work the sync of the annotations after each commit but Canvas gives a tool for this common case that will simplify the work:
// Annotate every figure conditionally
canvas.annotate( function(figure){ ... returntrueif it should be annotated ... }, { ... } );
You basically pass a filter function that will be used to dynamically find to which figures this annotation needs to be drawn. There is one shortcut in place if you just want to annotate every figure (also dynamically):
// Annotate all figures, same as function(figure){ return true; }
canvas.annotate( 'all', { ... } );
The basic parameters that you give to the annotation are:
Param
Type
Definition
text
string
Message to include next to the figure
pen
Pen
Pen used to stroke the highlight box
brush
Brush
Brush used to fill the highlight box, alpha is supported
color
Color
Message color if you want it to be different from the box color
Lets use a dynamic annotation to give feedback to the user about a probable date issue in its template:
// Annotate text that looks like date with "Not 2014?"
canvas.annotate( function(figure){
if( figure instanceof Cx.Text ){
var year = parseInt(figure.text(),10);
if( 2000 < year && year < 2014 )
returntrue;
}
returnfalse;
},{
text: 'Not 2014?',
pen: Cx.Pen({color:Cx.Color({rgb:'F04111'})})
});
canvas.render$();
Here is what the user will see:
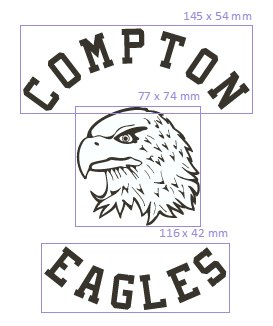
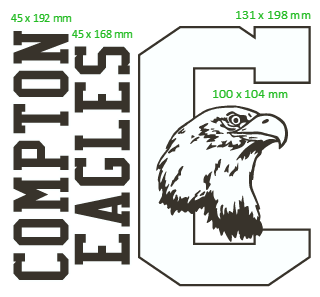
In this case the message is the same for all figures that pass the condition. But if you use dynamic annotations, you will normally want to set an individual message for each figure. Each of the annotation parameters accepts a function that takes a figure and returns the processed value. A good example, lets show the bounds of each figure to the user as an annotation:
// Annotate all figures with their bounds extents
canvas.annotate( 'all', {
pen: Cx.Pen({color:{rgb:'9A8CDB'}}),
text: function(figure){
var bounds = figure.bounds_();
return bounds.width().toFixed(0) + ' x ' +
bounds.height().toFixed(0) + ' mm';
}
});
canvas.render$();
Important The functions passed to annotate can safely use the sync version of the figure metrics ( figure.bounds_() ). Canvas will only produce the annotation when the figure has been properly updated. This will simplify a lot of use cases that involves metrics, like annotate to small or to big figures.
We can play with the box style, use dashed lines. Or only show the text. For example, if you do not pass any pen. The result will look like:
This looks really nice in this example, but it will be confusing if there are many overlapped figures. But I like the idea of having less noise so we can show annotations without the fear of covering everything with lines.
You have the option to use a different box style, using the boxStyle parameter. Only the default and ‘Clean’ is supported for the moment. The ‘Clean’ style only draws the corners of the box, so it looks like:
It is also possible to use overlapping annotations, the system will just place the messages on top of each other. But it is a good idea to avoid using to many annotations at the same time, and give the user some way to choose what he want to see.
If you want to remove the annotation, keep a reference to it and pass that to the Canvas unannotate function like:
var ann = canvas.annotate( figures, { ... } );
// later...
canvas.unannotate( ann );
You can also just clear all the annotations using:
Applications needs to be able to define the conditions under wich figures are able to be modified. These conditions are bussiness logic that is App dependent and can not be abstracted directly in Canvas. The Figure Conditions API fill this need providing a way for App to express rules that Canvas will use internally. At the same time, these conditions can be used by Apps to define their own logic. A condition query DSL is provided that makes it easy to define if a list of figures complies with a set of conditions.
App level conditions
Cx.Figure.condition defines or extends a condition:
Once a condition is defined, it can be used to check if a list of figures fullfills the rule.
if( canvas.are(figures,'scalable') ){
// Good to go, allow this action...
Several conditions can be combined in single query
if( canvas.are(figures,'rotatable','scalable') ){
// Ok, transform the figures...
Because the figures will usually be the canvas.selectedFigures() list, you can just pass the target figures directly to the query:
if( canvas.are('selectedFigures','groupable') ){
// Green light, enable the group action buttons
All valid targets are accepted: 'figures', 'contextFigures', 'allFigures'.
Canvas driven by the App
Canvas uses conditions query checks internally in the Select Tool, the 3D Tool interaction, the HUD tools and actions and generally in every place that requires a decision that is better defined by the App.
The following conditions are checked: 'selectable', 'movable', 'scalable', 'rotatable', skewable', 'groupable', 'nodeEditable', 'zorderable'. For example, in 3D mode texture islands transformations are restricted and they are only movable and rotatable.
If the application extends any of these conditions, Canvas will correctly follow their rules.
Canvas pre-defines the following conditions: 'text', 'shape', 'raster', 'group', 'proxyGroup'. Fine grained: 'simpleText', 'multiPartText', 'typesetText', 'fullColorRaster', 'monochromeRaster'. For 3D mode: 'textureIsland'
These conditions can be used to simplify the condition definitions.
// Only text can be moved in this App
Cx.Figure.condition('movable','text');
The ! char can be used to negate a condition.
// Proxy Groups are not groupable in this App
Cx.Figure.condition('groupable','!proxyGroup');
Async Conditions
Async conditions can be specified post fixing the name with the $ char
Array conditions are combined with figure conditions when querying.
Cx.Figure.condition('groupable','!raster');
Cx.assert( canvas.are([ raster, text ],'groupable') == false );
// It passes the array condition, but fails because there is a raster
Canvas defines array conditions for 'groupable' and 'zorderable'. It also defines helper conditions to check the number of figures: '1', '1+', '2', '2+'.
Cx.Figure.arrayCondition('groupable','2+');
Canvas Instance Conditions
It is advisable to use as much as possible App level figure conditions to define the rules of the application. If specific logic is needed for a given Canvas instance, the canvas version of the condition and arrayCondition functions can be used. This may be used to implement an interactive preview where figures can only be moved.
// None of the figures will be scalable in this Canvas
// Disallow z ordering if there is more than one figure in the list
canvas.arrayCondition('zorderable','1');
Canvas queries
Query to check if a list of figures fullfills a set of requirements
canvas.are(figures,conditions...);
canvas.are$(figures,conditions...);
Query to check if a single figure fullfills a set of requirements
canvas.is(figure,condition...);
canvas.is$(figure,conditions...);
Query to filter the figures that fullfills a set of requirements
canvas.only(figures,conditions...);
canvas.only$(figures,conditions...);
Save and Restore conditions
If the App can spawn several modes, each with its own bussines rules, common global conditions can be defined and then each mode can save at start up the current state of the conditions and restore them when the mode is changed (in the same way that HTML5 Canvas context.save() and canvas.restore() works).
Cx.Figure.saveConditions();
Cx.Figure.restoreConditions();
The same can be done with Canvas conditions, although normally it will be more convenient to instanciate a new Canvas for each mode.
Canvas arrays needs to fire events when they are modified so others can sync with them and expose extra functions to simplify their use: add, remove, replace. Canvas arrays are Array-like objects, all the standard array functions are exposed and you can use them as you will use normal array:
// Plain iteration
var figures = group.figures();
for( var n = 0; n < figures.length; n++ ) {
var f = figures[n];
// ...
}
// Lo-dash iteration
_.forEach(group.figures(),function(f){
// ...
});
Only the a[n] = o write interface needs to be avoided. Instead you need to use replaceAt or at.
// Wrong!
figures[2] = text;
// Good...
figures.replaceAt( 2, text );
The problem with using figures[2] = o, will just modify the 2 property of figures and nobody will know that this change has happened. For example, when you use replaceAt, there is code that deletes the old figure view and adds a new one (all this sync code is handled behind the scene). There is also another problem, if you set figures[6] in a 4 element array, the length should change but it will still be 6.
There are running standards to try to identify array like objects so it is easier to code utility libraries that are supposed to work with them. Underscore.js takes the approach of defining that if object.length is a positive number, then the object is array like. You will see checks in their code base like: obj.length === +obj.length.
Lo-dash and Undercore.js and other functional libraries do not modify the arrays you pass to them, they create new arrays with the results (_.map, _.filter, etc). Even things like _.shuffle. An array-like object then works fine on them, you can filter the arguments object for example, or a jQuery array.
Rationale
In Javascript we can not create a class that derives from an Array object, with different compromises. We played with that ideas but we couldn’t impose the compromises they propose to Canvas (the closest one).
jQuery actually uses something similar to this, at least in the final structure of their arrays.
var buttons = $('.button');
buttons is an Array Like object (like the ‘arguments’ function var). It has a length integer property, and their elements can be accessed using buttons[n] as a normal array. Because of this, every library that is coded to be able to handle javascript array like objects will work perfectly with them. You can use:
_.forEach( buttons, ... );
jQuery is not deriving from Array. Their array like object is actually just a normal object that has a length property and a ‘0’, ‘1’, ‘2’, etc property. Like this:
var jArray = { length: 3, '0': a, '1': b, '2': c };
Or equivalent:
var jArray = {};
jArray.length = 3;
jArray[0] = a;
jArray[1] = b;
jArray[2] = c;
So this works fine:
for( var n = 0; n < jArray.length; n++ ) {
var v = jArray[n];
// ...
}
Performance
Ecen if using an object {} instead of an array [] has performance implications, the best argument to show that it is not that bad is that jQuery arrays are actually created like this. There is a test page in jsPerf. You can look at the bar graphs, the three first are Array Like (assign, create and for each), the second three are Native Array. Some conclusions:
1) Chrome is awesome. Using plain objects is actually faster than native arrays. 2) Firefox also have better iteration and assign behavior in Array like objects. 3) IE is more consistent with ~2.5x performance penalty.
The test are using 1000 elements arrays, quite above the mean size of our own arrays (10 figures are big arrays in our system). So it seems that the price tag is quite low, given that the iteration cost almost disappear in the big picture of the computations Canvas or clients are performing.